Showing posts with label recipes. Show all posts

Monday, February 25, 2013

Pretzel Bites

I have always wanted to try making soft pretzels at home, but I was so intimidated by them. It seemed like there were so many steps and I was convinced I would ruin them if I ever tried.

Enter Oscar night. I knew I wanted to bring something salty and I also wanted to try something different. What better time to face ones fears! And honestly? These really couldn't have been simpler. You definitely can't be in a rush, though, as you need to let the yeast in the dough work its magic for at least an hour. The pretzels were great on their own, but the recipe I found recommended a cheddar cheese dipping sauce.

Gee, twist my arm!


SOFT PRETZEL BITES

1 1/2 C warm water
1 package active dry yeast
2 Tbsp light brown sugar
3 oz unsalted butter, melted
2 1/2 Tsp kosher salt
4 1/2 to 5 C all-purpose flour
Vegetable oil
3 quarts water
3/4 C baking soda
1 egg, beaten with 1 Tbsp cold water
Sea salt (The recipe calls for coarse salt - I only had fine salt and it worked just fine)

*In a stand mixer, combine water, yeast, brown sugar and butter. Mix with a dough hook until combined and let sit for 5 minutes. (You'll see the yeast become foamy on top.)
*Add the salt and flour gradually at low speed. Increase the speed to medium and knead the dough until it becomes smooth and pulls away from the bowl, about 3-4 minutes. If the dough is too wet, add more flour, 1 Tbsp at a time.
*Remove dough from the bowl and knead with your hands. Oil a large bowl and turn the dough to coat. Cover with a towel and leave in a warm place until doubled in size, at least one hour.
*Once the dough has risen, remove from the bowl and divide into 8 equal pieces, roughly 4 1/2 ounces each. (I used my kitchen scale for this, topped with plastic wrap so the dough didn't stick.)
*Roll each piece into a rope, starting in the middle and working your hands outwards. Cut the dough into 1-inch pieces to make the bites. (I used a pizza cutter - brilliant!)
*In a large pot, bring the water and baking soda to a boil. In batches, boil the bites for about thirty seconds. Use a slotted spoon to remove the bites from the water, and place on greased cookie sheets. Make sure the pretzel bites are not touching!
*Brush each pretzel with the egg wash and sprinkle liberally with salt.
*Bake at 425 degrees for 15-18 minutes, or until brown. (For my oven, I was done at 13-14 minutes, so keep an eye on them!)
*Let cool for 5 minutes and serve. I know it will be difficult, but try to share!

CHEESE SAUCE

1/2 Tbsp unsalted butter
1/2 Tbsp flour
1/2 C milk
8 oz cheddar cheese, grated

*Melt the butter in a saucepan over medium heat. Add flour and cook for one minute.
*Add milk and mix until slightly thickened.
*Remove from heat and add cheese. Mix until the sauce is smooth. Season with salt and pepper, if desired.

Wednesday, February 13, 2013

Wonton Wednesday

Remember that cooking class Mr. Malone and I took awhile back? We have been talking about actually making dim sum at home ever since, and didn't actually see it through until last night. The wontons didn't look so appetizing once they were steamed, but they sure tasted great!

Our happy little wontons, before they hit the steamer.

STEAMED SHRIMP & SCALLION WONTONS
*Via HipCooks

3/4" piece fresh ginger, peeled
2 cloves garlic, peeled
1 bunch cilantro (As you may know, I hate cilantro, so we added very little.)
2 Tbsp soy sauce
1 Tbsp sesame oil
2 green chilies (Or more if you like it. 2 had plenty of kick for my taste buds.)
1 pound shrimp, shelled
1 package wonton wrappers (We used square, but I think round would have been easier.)

*In a food processor, mix ginger, garlic, cilantro, soy sauce, sesame oil and chilies. Taste before adding the shrimp! Add more garlic or ginger, if needed.
*Add shrimp and mix until combined.
*Place a heaping teaspoon of the shrimp mixture in the middle of the wonton wrapper. Use a little bit of water on the edges, to seal. Make sure seams are closed tightly!
*We steamed our wontons in the rice cooker, but you could pan fry these as well. We were also able to freeze more than half, making an easy dinner in the future. Enjoy!

Friday, February 1, 2013

Oatmeal Raisin & Cranberry Cookies

I'm apparently on an oatmeal kick lately - muffins AND cookies. Along with running, I find baking to be quite the stress reliever. It doesn't hurt that oatmeal raisin cookies are Mr. Malone's favorite. (When is he going to start baking?!)


OATMEAL RAISIN & CRANBERRY COOKIES

3/4 C butter (1 1/2 sticks)
1 C brown sugar, packed
1/2 C granulated sugar
1 Tsp baking soda
1/4 Tsp baking powder
1/2 Tsp cinnamon (This is optional, but I went for it)
1 egg
1 Tsp vanilla extract
1 3/4 C all-purpose flour
2 C rolled oats
1/2 C raisins
1/2 C dried cranberries

*Preheat oven to 375 degrees.
*In a large bowl, or KitchenAid, cream butter on medium speed.
*Add brown sugar, granulated sugar, baking soda, baking powder and, if desired, cinnamon. Mix until combined, scraping the sides of the bowl occassionally.
*Beat in egg and vanilla.
*Slowly add flour, making sure all ingredients are incorporated.
*Stir in oats by hand. Once combined, add raisins and cranberries.
*Place dough by rounded teaspoons onto baking sheets, leaving an inch or two in between. (The dough didn't spread very much. I was able to get 12-13 cookies per sheet.)
*Bake for 10-12 minutes and enjoy!

Thursday, January 24, 2013

Oatmeal Banana Muffins

Oh, Pinterest. I may have to scroll through endless wedding-related pins, but there is always a gem buried somewhere.

Enter these muffins, which in turn, led me here. (Confession: I think these two are ridiculously adorable and I have a total blog crush. Oh my god, Pinterest has made me I am crazy.)

Back to the muffins. Delicious and so easy! I needed something that would be a quick breakfast on the go and these delivered. However, I need to stop using cupcake liners - the paper is stuck to the bottom of the muffin! I mean, eating only the tops aren't that bad, but I want the whole darn thing. (Does this happen to anybody else? What's the remedy?)


OATMEAL BANANA MUFFINS
*Via C&E

2 1/2 C old fashioned oats
1 C plain low-fat Greek yogurt
2 eggs
3/4 C sugar
1 1/2 Tsp baking powder
1/2 Tsp baking soda
2 ripe bananas (I used 3 - loved the banana flavor)

*Preheat oven to 400 degrees and get your muffin tin ready. (Don't be like me - use nonstick cooking spray!)
*Place all of the ingredients in a blender and mix until smooth. (Add the oats one cup at a time.)
*Pour batter into muffin tins and bake for 15-20 minutes, or until a toothpick comes out clean.

Enjoy! And thanks for a great recipe, C&E!

Thursday, January 10, 2013

Chicken Tortilla Soup

 
There is nothing more satisfying than a bowl of soup on a cold day. My go-to? Chicken tortilla - chunks of chicken & yellow bell pepper in a delicious tomato broth. Oh, my mouth is watering just typing! Vegetarian? I've never tried it, but I'm sure this soup would be just as wonderful without the chicken. (I'm talking to you, Jen!) For those of you who test it out in your own kitchen, I hope you love it as much as I do.

CHICKEN TORTILLA SOUP
*Via Sunday Soup 

1 small chipotle pepper (canned in adobo)
1 1/2 Tbsp olive oil, plus more for frying
1 C onion, chopped
1 Tbsp minced garlic
2 Tsp ground cumin
1 1/2 Tsp dried oregano
1 - 28oz can diced tomatoes, drained well
6 C chicken stock
1 pound chicken, cut into bite-sized pieces
1 yellow bell pepper, cut into strips (The bell pepper is my favorite part - I use two.)
2 Tbsp fresh lime juice
Salt, to taste
6 Corn tortillas

*Rinse the chipotle pepper and pat dry. Cut a lengthwise slit in pepper & scrape out seeds. Coarsely chop the pepper and set aside.
*Heat 1 1/2 Tbsp olive oil in a stock pot over medium heat. When hot, add onion and cook until softened - about 4-5 minutes.
*Add garlic and cook for 1 minute more. Add chopped chipotle, cumin, oregano, tomatoes, and stock.
*Bring mixture to a simmer and cook for 10 minutes.
*With an immersion blender, purée the soup in the pot. (If you don't have an immersion blender, transfer soup to a food processor or blender - whatever will make it smooth!)
*Bring puréed mixture to a simmer over medium heat and add chicken & bell pepper. Cook until chicken is cooked through and peppers are tender - about 5 minutes.
*Stir in lime juice and season with salt, as needed.
*For the garnish, cut the tortillas into strips. Coat a skillet generously with olive oil and place over medium-high heat.
*When oil is hot, add one-third of the strips and sauté until golden and crisp. Drain on paper towels.
*Ladle soup into a bowl and top with a handful of fried tortilla strips. (You can also add cilantro or sour cream - go nuts!)

Sunday, December 9, 2012

Who's Who in Whoville?

Just what I needed - a girls' night in with Dr. H and MiMi

Featuring: 
- Dr. Seuss' How the Grinch Stole Christmas (hence the clever blog post)
- Holiday wine charms
- Salted caramels
- One-pot pasta (thanks, Martha!)
- Wine (to go with the aforementioned wine charms)
- Logo Quiz
 - Holiday cheer


NUTELLA SEA SALTED CARAMELS
*Via bell'alimento

14 Tbsp unsalted butter
3/4 C light brown sugar
1/2 C sugar
3/4 C light corn syrup
2 Tsp sea salt
1/4 C heavy cream
2 Tsp vanilla extract
2 Tbsp Nutella
Fleur de sel, to garnish

*In a heavy bottomed sauce pan, combine butter, sugars, corn syrup, sea salt & cream.
*Bring to a boil until sugars are dissolved and mixture is combined.
*Using a candy thermometer, watch mixture until it reaches 230 degrees.
*Remove from heat. Stir in vanilla and Nutella.
*Allow to cool for a couple of minutes. Pour into an 8x8 pan that has been lined with parchment paper.
*Again, allow to cool. Sprinkle with fleur de sel and refrigerate for several hours.


Yet another photo app I've discovered - Snapseed.


Friday, November 30, 2012

Culinary Tomfoolery

I don't know where the inspiration (cough - Pinterest, foodgawker, and Punchfork - cough) came from, but I've been trying out some fun new recipes.
This quinoa was delicious, and a nice way to spice up taco night. I opted for no cilantro & added some diced bell pepper. Perfect leftovers for lunch AND Mr. Malone approved!

{Gruyere Asparagus Tarts}

How can you really go wrong with puff pastry & cheese? (A universal question, I know.) However, this is one of those recipes where the actual cooking time was WAY different than what the recipe called for. My puff pastry became golden brown really quickly. I'm thinking next time I may bake at a lower temperature, along with adding more cheese! I finished these off with a balsamic reduction... the flavors were killer. (Gross, I sounded like Guy Fieri right there.)

- happy weekend, kiddos -

Sunday, November 18, 2012

Nuts & Bolts

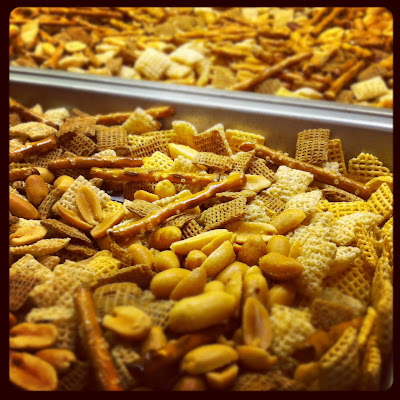
My favorite thing about Thanksgiving is the heavenly mixture of Chex cereal, pretzels & peanuts. No, this ain't your mama's Chex mix. I'm talking Nuts & Bolts here, people.


"But Lauren, what about the turkey?" Fuhgeddaboudit!
"Not even pumpkin pie?" Fuhgeddaboudit!

This recipe is so good, it obviously brings out the New Yorker in me.

Do yourself a favor this holiday season - spend a Sunday making multiple batches of this and share with those you love. WARNING: Have dental floss ready.


NUTS & BOLTS
*Via Mama Jewski

1 Tbsp whole mustard seed
1/3 C unsalted butter
1 Tbls Worcestershire
1 Tsp chili powder
1 Tsp cinnamon
5 C Chex cereal (Use any combination you like - I prefer 2 cups Corn, 2 cups Rice and 1 cup Wheat)
1 C salted peanuts, no skins
1 C stick pretzels (Yes, stick pretzels!)

*Put Chex, pretzels and peanuts on an ungreased cookie sheet. Set aside.
*In a small saucepan over low heat, combine butter & mustard seed. Keep covered and cook until seeds pop. (This takes awhile. Unfortunately, you need to be patient. It's the perfect time to open a beer!)
*Once the seeds have popped, remove the pan from heat.
*Add Worcestershire. This will steam... be careful!
*Add chili powder to the sauce pan and stir to combine.
*Pour sauce over the cereal mixture and stir gently.
*Sprinkle cinnamon over the cereal.
*Bake in a 300 degree oven for 30 minutes, stirring every 10. (Ovens will vary. Check after 7-8 minutes.)
*Let cool completely on paper towels and store in an airtight container. (Tastes even better on day two or three!)

Happy Thanksgiving!

Friday, November 16, 2012

Fancy Friday

I'm looking forward to a dinner party with these two ladies, the newest Twilight movie (for comic relief), and a day of baking!

{fine china, for the win}

{homemade wine charms}

{the main course for tonight}

Wednesday, October 10, 2012

Pad Thai

We love Alton Brown in our household. We own all of his cookbooks and find his recipes to be (relatively) simple and delicious. (As previously mentioned, his guacamole is bananas.) His recipe for pad thai is no different, and has become a staple in our menu planning. The key? Prep work! Get all of your ingredients assembled in small bowls BEFORE heating the wok.


 PAD THAI

1 oz tamarind paste
3/4 C boiling water
2 Tbsp fish sauce
2 Tbsp palm sugar (I've always used granulated sugar.)
1 Tbsp rice wine vinegar
4 oz rice stick noodles
6 oz Tofu (Another change - I use boneless, skinless chicken breasts. Usually 2 or 3, depending on the size.)
1-2 Tbsp peanut oil
1 C chopped scallions
2 Tsp minced garlic
2 whole eggs, beaten
3 oz bean sprouts
1/2 C chopped peanuts
1 lime, cut into wedges

*Place the tamarind paste in the boiling water and set aside.
*Combine fish sauce, sugar and rice wine vinegar in a small bowl & set aside.
*Place noodles in a shallow dish and cover with hot water. (This is where we've had some issues - the package says soak for 30-45 minutes. Not long enough and they are too hard. Too long and they are gummy. It's a work in progress!)
*Measure out all other ingredients into small bowls. Again, this will make your life easier!
*Press tamarind through a fine mesh strainer and add to the fish sauce mixture.
*Heat a wok over high heat. Once hot, add 1 Tbsp of the peanut oil.
*Cook chicken (or tofu) until done - just a few minutes. Remove from wok and drain.
*If necessary, add 1 Tbsp of peanut oil to the wok and heat until shimmering.
*Add 2/3 of the scallions and garlic. Cook for 10-15 seconds.
*Add eggs; once eggs begin to set, stir to scramble.
*Add the remaining ingredients in the following order and toss after each addition: noodles, fish sauce mixture, 2/3 of the bean sprouts, peanuts and chicken.
*Toss everything until heated through, but no longer than 2 minutes.
*Garnish with remaining bean sprouts, scallions, peanuts and a lime wedge.

YUM!

Wednesday, July 11, 2012

Black Bean Salad

Hello, Summer. Glad you have decided to {finally} make an appearance!

Here is a super easy, and tasty, side for all of those BBQs - enjoy!

{via}

SOUTHWESTERN BLACK BEAN SALAD
*Via skinnytaste

1 - 15.5 oz can black beans, rinsed & drained
9 oz frozen corn, thawed
1 tomato, chopped
1/4 C red onion, chopped
1 scallion, chopped
1 lime, juiced
3 Tbsp olive oil
1 Tbsp chopped cilantro
1 avocado, diced
Salt & pepper

*Combine beans, corn, tomato, red onion, scallion, cilantro, salt & pepper in a large bowl - mix gently.
*Add olive oil and lime juice - stir to combine.
*Let sit in the refrigerator for 30 minutes.
*Add diced avocado right before serving.

Friday, May 4, 2012

Cinco de Mayo

Happy {early} Cinco de Mayo!

As I will be far too busy celebrating this lovely lady's nuptials mañana, I thought I would share my favorite guacamole recipe.

Um, seriously. This shit is delicious and highly addictive. You've been warned.


GUACAMOLE

3 ripe Hass avocados
1 lime, juiced
1/2 teaspoon cumin
1/2 teaspoon kosher salt
1/4 teaspoon cayenne
1/2 white onion, diced
3 roma tomatoes, seeded and diced
1 clove garlic, minced

*In a large bowl, coat the avocado pulp with lime juice.
*Add cumin, salt, and cayenne. Combine using a fork or potato masher. 
*Gently fold in onion, tomato and garlic. (You could also add cilantro, but I hate it... so I don't!)
*Let sit for 1 hour - TORTURE!!

Thursday, February 9, 2012

Super Bowl Pinwheels

Sure, this may be a bit late, but I stumbled across this recipe AGAIN on one of my favorite websites - foodgawker. Warning: do NOT look at this website right before a meal. It will make whatever you are having seem extremely depressing. (I should begin to practice what I preach...)


SPINACH GRUYERE PINWHEELS

1 package (10oz) frozen spinach, thawed
1/2 C shredded Gruyere cheese (I used more - sue me.)
1/4 C grated Parmesan cheese
1/2 tsp salt
1/2 tsp black pepper
1/8 tsp garlic powder
1 egg
1 Tbsp water
1 sheet puff pastry, thawed (I used Pepperidge Farm.)

*Preheat oven to 400 degrees. Line a rimmed baking sheet with parchment paper, or Silpat. (I love mine!)
*Wrap the spinach in a paper towel and squeeze out as much excess water as possible.
*Combine spinach, cheeses, salt, pepper, and garlic powder in a medium bowl.
*In a small bowl, beat the egg and water together.
*With a rolling pin, form the puff pastry into a (roughly) 12x12-inch square. Lightly brush with the egg wash and spread the spinach/cheese mixture in an even layer.
*Roll the puff pastry and pinch at the seam to seal. Cut the roll into about 20 slices and brush the tops with egg wash.
*Bake for 15 minutes, or until the pinwheels are golden brown.

Saturday, January 21, 2012

Zucchini Bread

I obviously kept myself busy over the snow days. Enjoy!


INGREDIENTS
3 C flour
3 tsp cinnamon
1 tsp salt
1 tsp baking soda
1/4 tsp baking powder
3 C grated zucchini (I used two zucchini, but it depends on the size)
2 C sugar
1 C vegetable oil
3 eggs
3 tsp vanilla extract

*Preheat oven to 350 degrees.
*Lightly grease two loaf pans with cooking spray.
*In a small bowl, combine dry ingredients.
*In a medium bowl, combine wet ingredients. Gently fold in zucchini.
*Gradually add the dry mixture to the wet ingredients, mixing thoroughly.
*Divide mixture into both pans and bake for 45-60 minutes. (Ovens vary! My bread was done after 45 minutes, so make sure you check with a toothpick or a knife before removing.)

Wednesday, January 18, 2012

Blizzaster 2012

In case you have been living under a rock the past couple of days, Seattle got hit with some snow. Like any true Seattle-ite, I was wary of the predictions. Ten to fourteen inches? Riiight, I'll believe it when I see it.


I am not a big snow person, but I love looking at it. Today, however, was a SNOW DAY! Any time you can get paid to stay at home is pretty superb. And it was extremely productive. Mr. Malone put in four hours of work, I was busy cleaning the kitchen, and I also tried out a new recipe.

Pre-roasting.
The finished product - not too shabby.

We also took a brief walk around the 'hood. You didn't think I would miss an opportunity to try out the "Snow" setting on my new camera, did you?!


Neighborhood Watch

Annnnnd, it just would not have been right to NOT take advantage of day drinking.


Hope you all survived Seattle Snowpocalypse!

Monday, December 19, 2011

My Favorite

It is not Christmas until these have been made. These are, hands down, my all-time favorite Christmas cookie... EVER!! I wouldn't call them holiday specific. In fact, I don't even think they are a cookie. But they are freaking tasty.

PEANUT BUTTER CRUNCHIES
1 C dark Karo syrup
1 C sugar
1 C smooth peanut butter
5 C Special K cereal
6 oz chocolate chips
6 oz butterscotch chips

*In a saucepan, combine Karo syrup & sugar over medium heat. Do not boil! (I learned this the hard way) Once combined and smooth, take off flame.
*Add peanut butter and stir thoroughly.
*In a large bowl, pour peanut butter mixture over cereal. Press into a well greased 9x13 pan.
*Melt (either by double boiler or in the microwave) the chocolate & butterscotch chips until smooth.
*Spread chocolate mixture over cereal and let sit over night. Do not refrigerate! (I also learned this the hard way)
*Once cool, cut into squares and devour enjoy!

Those beauties in the top right corner - my absolute favorite.

Sunday, December 4, 2011

Christmas Baking

Question. How do you properly spend a Saturday afternoon in December?
Answer. By making delightful treats to be selfishly consumed shared with others!

My friend Elise, being the amazing dental student that she is, came up with the idea to spend a few hours baking and constructing sweets for the holiday season. Me, having a giant sweet tooth (and knowing that she will need patients in the future), agreed to this request. Duh.

Here are some photos of our finished products, with the recipe for the cookies - which I found here.


CHOCOLATE PEPPERMINT COOKIES
1 C shortening
1/2 C sugar
1/2 C light brown sugar (packed)
2 eggs
1 1/2 tsp vanilla extract
1/2 tsp butter flavoring
2 drops peppermint extract
2 3/4 C all-purpose flour
1 tsp salt
1/2 tsp baking soda
Crushed candy canes (We used 3 for the dough and 5 for the topping)
Chocolate, for melting (We used dark & milk chocolate)

*In a bowl, cream shortening and sugars. Add eggs, one at a time, and beat well after each addition.
*Mix in vanilla, butter & peppermint extracts.
*In a separate bowl, combine the dry ingredients. Gradually add to the creamed mixture.
*Stir in crushed candy canes.
*Shape into a 15-in roll and wrap in plastic. Refrigerate for four hours or until firm.
*Preheat oven to 375 degrees.
*Unwrap cookie dough and cut into slices, placing on ungreased baking sheets. Bake for 6-8 minutes, or until edges begin to brown.
*Melt chocolate, if using, in a double boiler. Dip half of the cookie in the chocolate and lay on wax paper to harden. Sprinkle with crushed candy canes before the chocolate sets.

Tuesday, October 18, 2011

Something About Pumpkins

My house smells amazing! Why, you ask? Because I have been on a pumpkin bread kick for the past few weeks. And oh.em.gee - this is the stuff!


Ingredients
3 1/2 C all-purpose flour
3 C sugar
2 C canned pumpkin
1 C vegetable oil
2/3 C water
3 tsp nutmeg
3 tsp cinnamon
2 tsp baking soda
1 1/2 tsp salt
4 eggs

*Preheat oven to 350 degrees.
*Lightly grease two loaf pans with cooking spray.
*In a large bowl, mix all ingredients until thoroughly combined.
*Divide mixture into both pans and bake for 55-60 minutes.

I have found that taking the bread out of the oven at 55 minutes results in something more - sorry for word usage! -  moist. Be sure to insert a toothpick or knife into the center of the bread to see if it comes out clean. Happy baking, kiddos!

Friday, September 23, 2011

Tailgate Time

Crisp air. Falling leaves. Starbucks' salted caramel hot chocolate! Fall is practically here and with the changing of the season comes one of my favorite things: football. Having spent most of my life in the suburbs outside of Seattle, I grew up with the Washington Huskies. However, I didn't realize what fully appreciating the Dawgs meant until Mr. Malone came into my life. You see, Mr. Malone comes from a BIG family... and many of them are UW Alumni. Because of that, my hubby has bled purple and gold since birth.

A couple of weeks ago for the Hawaii game, which started at 12:30, I decided to bring something breakfast related, as we'd be getting to the North lot around 8am. I found these babies on Pinterest and knew I had to give them a shot. Well, they were a HUGE hit, and the possibilities are really endless when it comes to what you add! They were so popular that I plan on making them again tomorrow for the game against Cal - Go Dawgs!

INGREDIENTS
8-10 eggs
1 tsp flour
Salt and pepper, to taste
Topping Ideas: crumbled bacon, sausage, diced bell peppers, minced onion, asparagus, grated cheese.. The list goes on!

*Preheat oven to 350 degrees and grease 2 muffin tins with a non-stick cooking spray.
*Distribute toppings evenly among each muffin cup.


*In a bowl, beat the eggs with the flour and pour into muffin tins. (I used a large measuring cup, as it made pouring much easier)


*Bake for 12-15 minutes, or until the eggs are cooked through.


Note: The eggs may look like they are starting to puff up while baking, but they will "deflate" when taken out of the oven. You don't need a lot of the egg mixture in each cup - once cooked they are a great size. Perfect for a quick breakfast on the go or for cheering on your favorite team!

Tuesday, September 13, 2011

Salad Dressing 101

“Homemade” could be one of my favorite words, especially when it has to do with cooking. (Remember this little ditty?) Sometimes, it is really nice to take the long route when preparing a meal, because more often than not, the end result is that much more delightful. My primary example is pizza. When Mr. Malone and I make pizza, the dough and the sauce are made by yours truly. (You totally want to come over for pizza now, don’t you?!)

Recently, I have been even more inspired to make things myself, as opposed to buying them. This is a great way to save money and it is fun! My most recent endeavor was salad dressing. You may think that salad dressing isn’t that big of a challenge, but I have never had much luck in making one that I wanted to have on hand at all times.

But finally! Mama Jewski came along and told me about a Caesar salad dressing from her Ellie Krieger cookbook. I have never worked with anchovy paste before, and I will admit, I was terrified. I know that most Caesar dressings have anchovy in them, but there was something about the fact that I was willingly adding it that grossed me out! In the end, it was delicious. What I really like about it is the consistency. It is not really creamy, which can be good at times, but for a hot summer day, this lighter version was perfect.

INGREDIENTS
1/4 C pasteurized egg product (Egg Beaters)
1 clove garlic, minced
1 1/2 tsp anchovy paste
1 tsp Dijon mustard
1/4 tsp Worcestershire sauce
2 Tbsp fresh lemon juice
3 Tbsp olive oil
1/4 C finely grated Parmesan (Use fresh if you have it)
Salt and pepper

*In a small bowl, whisk together the egg product, garlic, anchovy paste, mustard, Worcestershire sauce, and lemon juice.
*Slowly add the olive oil in a steady stream, whisking the whole time.
*Stir in the Parmesan and season with salt and pepper.

And there you have it - how easy is that? Whether it's for a side salad, or for a grilled chicken wrap, this dressing is sure to please. Hope you enjoy!

LinkWithin

Related Posts Plugin for WordPress, Blogger...